When you’re in a pinch…

Monday, November 7, 2011

I always find the most gorgeous big flowers on Pinterest.

When deciding what to use for decorations for a Halloween party, I knew I wanted to make one of them. The problem was the most popular material for big, wonderful flowers is either crepe or tissue paper… neither of which I had.

*I should note that in planning ahead I could have easily picked up some, however this was 2 hours before the party and I was in a serious pinch!*

I DID however have plastic tablecloth that was too big for my table.

Ahh, necessity is indeed the mother of invention.

For this craft you will need:

A plastic tablecoth

*any color you want, go crazy!!*

Vase
*I actually used a water pitcher because the curved neck was perfect for holding the flower.
If you don’t have one though, you can use a vase with the same structure.*

Crepe Ribbon & Sparkly Ribbon
*the bottom of the flower will not fill the entire vase, so I used the crepe ribbon for a filler.The sparkly ribbon is used because it pretty andwill also cover up the divide between the crepe and flower.Play around with these. There are many different fillers you can use, and ribbon does not have to be sparkly… though it’s just so lovely when it is.*

Step 1: Cut a square(ish) shape from your tablecloth. No need to be precise with the lines.

Step 2: Fold the entire square accordian style.

Step 3: Fold it in half so the ends meet.


Step 4: Take the folded end and twist it about half the length of your now folded tablecloth.

Step 5: Fold the twisted portion in half & twist together.

Step 6: Fold it in half again & twist if you can.
**This is going to make a base for your flower so it’s able to stay in the vase.**


Step 7: Take the base you’ve created and stick in the vase or pitcher.

Step 8: This is what the ends of the folded tablecloth will look like when in the vase.
Now it’s time to get creative! Start by shmuzching the ends of the table cloth that will be your flower. Shmuzching is just my word for fluffing and shaping. There is no exact way to do it, just play around and see what you like.


Step 9 & 10: If you like the floral shape, start by forming your table cloth ends around the center. I used some of the ends to create petals, simply by taking the end
and tucking it into the vase.

So pretty!

Total cost: 97 cents for the tablecloth… I didn’t even use all of it.
Everything else I had on hand already.

A-mazing!

I can’t wait to use these for another party.
In pink or blue they would be perfect for a baby shower.

Happy Crafting!

Linked up to:
C.R.A.F.T.
Craftomaniac
Polish the Stars
Running With Glitter
Making the World Cuter
The Girl Creative
Sew Can Do
Sumo’s Sweet Stuff
Keeping It Simple
Home Stories A2Z
Tip Junkie
My Backyard Eden
Hope Studios
Sugar Bee Crafts
Today’s Creative Blog


Sunday Sweeting

Sunday, November 6, 2011

I love Sundays!

They are just so relaxing and a great way to get ready for the week.

My usual Sunday schedule is:

Go to church
Family time
Sunday dinner
Littlest boy gets in bed & oldest boy gets some IPad time.

After this I like to plan out what sort of crafty things I might do for the week, and
that involves perusing around on my favoritest of sites, PINTEREST.
I call this my Sunday Sweeting (check here).

Here are some of my most loved finds today:

FASHION
We are trying so to save money right now, and that means no extra money for new clothes.
The amazing thing is I’m actually excited about this because it means I’m going to have to get creative. Pinterest is filled with fantastic ideas & tutorials that will help revamp my current wardrobe. I can’t wait to try some of these out!

This shirt is from blog Ruffles & Stuff. I love it!
She just does the most a-mazing and creative projects, and this is just one of them.
If you haven’t checked out her site DO… it’s awesome!

How cute is this?! This scarf is from Desiree over at Cozihome.
Looking at this actually makes me excited for winter!

KIDS
This pic is from Jessica over at A Simple Kind of Life. and
had originally gotten the idea from here. These are just so oh-my-gosh gorgeous!
Love love love them!

Have you seen these everywhere? Because I have!
So adorable! You can buy them at this shop.
I’m hoping at some point I can find someway to make them.

BURLAP
I can’t believe how much I’ve been seeing this material pop up lately. I’ve seen it used in pillows, wreaths, accents for decor, frames, and pretty much anything you could think of!
I love it’s rustic feel and it just seems oh so perfect fall.

A-mazing! I just can’t express enough how much I love this. The shape it creates is so stunning. Check it out at Smilemonsters blog.

This came from Style Me Pretty. So simple, yet so beautiful. The combination with the glass and the silver just makes me happy… it’s that stunning.

What are you planning on creating this week?


Clean It Up Wednesday: #1

Wednesday, November 2, 2011
Welcome to the first ever

I’m so excited to be doing this new feature!

Every Wednesday I will be featuring a part of my house that is some serious need of TLC (or Tender Loving Cleaning). Now I’m talking SERIOUS cleaning. This is not going to be about your average pick up and go, everyday routine cleaning. This will be a “Fight the Hoarding” battle cleaning.My hopes for this feature are:1. To break my own messy habits, and create a clean and happy home.

I am a slob… for reals. I just never really learned to pick up after myself,
and I married someone who doesn’t pick up after himself either.
Add two kids and you have disaster.

2. To show others like me that it is easy to clean a super messy home
(and those not like me can say “Hey at least, my house isn’t THAT bad!” or
“Hey, if she can do it in a half hour just think how fast I could do it!”)

As I was perusing Pinterest I found a pin that linked to an article about how to get a clean home in 15 minutes. I was ecstatic! Finally, someone was going to fill me in on what the secret is.
Someone was going to let me know what I could do to fix my living situation. Sadly, I was in for a disappointment. What it should have been titled was “How to MAINTAIN a clean home in 15 minutes.” Not exactly what I was looking for. As I continued to look online, I just couldn’t find any good inspiration for CLEANING a truly messy home.
I might be a slob, but I don’t actually like living in a messy home.
You just get to a point where the mess is disheartening and you think to your self

“It’s easier to just live in this, then clean it.”

I want to prove that this is so NOT true.
It is not hard to clean up a super messy house.
It may not take 15 minutes, but with a little work and an hour of your time it CAN be done!

The first room I want to feature today is:

THE MASTER BEDROOM

Have I mentioned I’m totally nervous to show you these pics?
It’s like letting you in on a very personal secret.
Here goes…

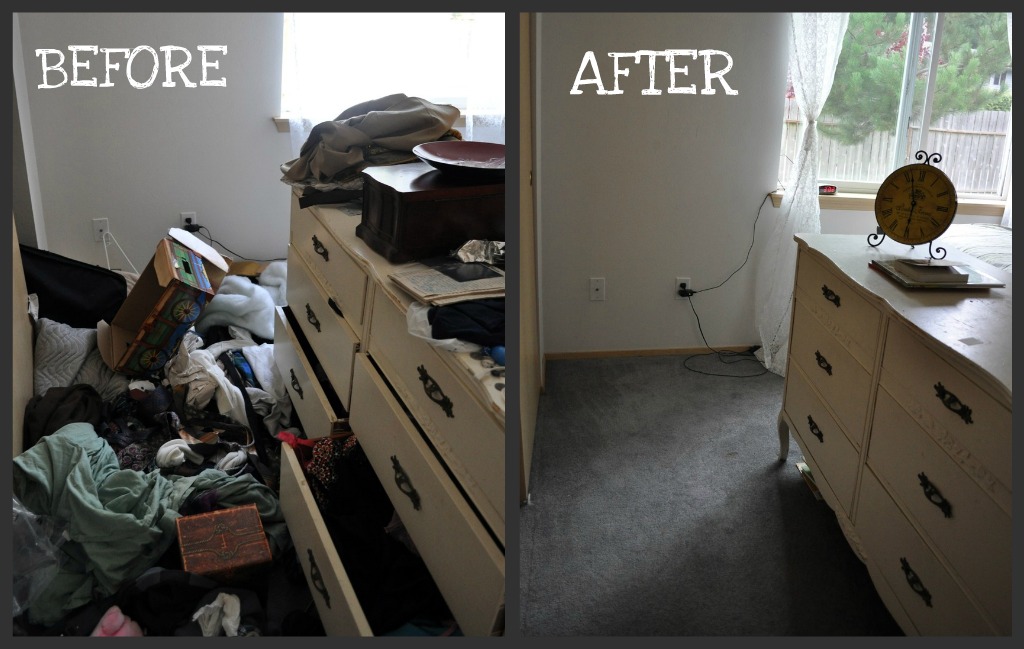
A view from the doorway:

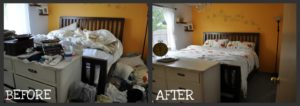
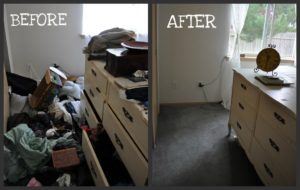
A view from in front of the dresser:

Decor I can now thoroughly enjoy!


Total amount of time spent cleaning: 50 minutes

Can you believe it?!
For under an hour I think it was quite a transformation!
I also put everything where it was supposed to go, I didn’t just stuff it in a closet to make it look clean. I would say I spent about 15 minutes putting things back where they belonged (such as books, toys, laundry, trash, etc.).

Here are my
TIPS & TRICKS
for tackling a mess like this.

– Breath in & out.

– Make one spot your inspiration point…
something you can look at to let you know that you can do this!
I started with my bed. A nice, made bed is the perfect boost to get you cleaning.

– Have trash bags and storage containers handy.
It makes sorting and transporting things easier.

– Organize the things that are not going to stay in the room into piles/sections/containers.
I did this in my hallway so that I could a little breathing room, and my categories were
Laundry, Toys, Shoes, and Trash.
Anything that was going to stay in the room (clothes, blankets, books, etc.) I immediately put in their appropriate places. When you are done cleaning the room, put everything in these piles/sections/containers where they are supposed to go.

DON’T GET DISTRACTED!

– Get a clean floor! Once you see that floor you will get a kick of adrenaline to get the rest of the room cleaned.

– Vaccum… it’s soothing, relaxing, and just seems to hum “You’re done…. you’re done.”

Now, enjoy your beautiful room!

Happy Cleaning!

P.S. I want to know what cleaning tricks you have up your sleeves!
What do you do to clean a super messy room?

Linked up to:
Someday Crafts
The Idea Room
The Shabby Creek Cottage
House of Hepworths
Somewhat Simple
Momnivore’s Dilemma
Southern Lovely
Mommy by Day, Crafter by Night
Organize & Decorate Everything
Fireflies & Jellybeans
A Glimpse Inside
Every Creative Endeavor
Sew Much Ado
Blue Cricket Design
Tidy Mom
Blissful & Domestic
New Nostalgia


Michele Alger
November 2, 2011 at 11:56 PM
Don’t you just love a transformation like that?! Love the art above the bed too…beautiful!!


Lizalou
November 3, 2011 at 12:04 AM
Thanks Michele! When I put the pictures side by side all I could think was “Wow.” I didn’t think the difference between them would be so incredible. Thanks for visiting!


Laura
November 3, 2011 at 3:38 AM
OMG, this is awesome. I think the thingI like the most is that you are keeping the job small … I room per week. my problem is keeping the room clean! Great job!! Love this post.


Reba
November 3, 2011 at 9:29 AM
This was great!!! Thank you so much for posting. Motivates me to get this house clean and keep it clean. The master bedroom looks great 🙂


Amanda K @ Every Creative Endeavor
November 3, 2011 at 10:35 AM
I love a good clean house and it seems like the bedroom always is the messiest so thanks you for the tips! And thank you for linking up!


Andy
November 3, 2011 at 2:19 PM
I am totally like you and appreciate the post. I have been trying to clean my whole house and just kinda gave up. You have re-motivated me and gave me some good ideas to help. Thank you!


sarah
November 3, 2011 at 10:55 PM
You should check out fly lady. My mom loves her. She gives tips on cleaning, organizing and maintaining a clean home. She is all about getting rid of clutter.


sstone
November 4, 2011 at 5:02 PM
What an awesome job! I love the achievableness of one room a week. Some weeks I have to just do a couple cupboards a week.:)
Shiloh
everydaygameplan.net


Danielle
November 4, 2011 at 11:15 PM
That is amazing the change! Go you for cleaning up. I swear ti is so hard and overwhelming at time. You are inspiring! Thanks for linking up and sharing:>


Lizalou
November 7, 2011 at 10:10 AM
Thanks for all the love Laura, Reba, Amanda K, Andy Sarah, sstone & Danielle! You ladies have given me the boost for the other rooms. Thank you for visiting!


Meredin
November 8, 2011 at 9:33 AM
My master bedroom looked similar to yours a few weeks ago. Since I didn’t want to bring home a new baby to a messy house I made a goal to deep clean a room a day (I didn’t have weeks left to do it in) I accomplished the bedrooms, bathrooms and the hallway before the baby came. The way I got through it was the opposite of yours (kind of) I made my bed first, then I went through ever surface in my room and took everything off of them besides what was supposed to be there. Everything else was either thrown away or put away where it was supposed to go. That was my motivation to get the floor cleaned up…and vacuuming at the end really is the biggest accomplishment! So far we have done a pretty good job of keeping the bedroom clean. I make it a goal to not put something down in there unless it belongs, and only in it’s right place. Now if only the husband tried so hard 🙂


Here’s wishing you…

Monday, October 31, 2011
A lovely & oh-so-happy Halloween!

Here’s a taste of some of the final decorations that
are going to be adorning our house tonight.


I made five of this cute little guys for our table.
I have a potpourri filled wrought iron pumpkin that they will be residing on for the evening.
They even have little bow ties for the occasion!


I was so frustrated when I couldn’t find a tutorial on making big flowers for a centerpiece
that didn’t involve tissue paper.
Don’t get me wrong, I do love the stuff… it’s just I wanted something a little different.

That’s when I came up with this. It’s made out of a plastic tablecloth,
the kind you would find by the party goods.
It gave me the big flower look I wanted, and I absolutely love it!!

I’m going to be posting the tutorials of these tonight and tomorrow.
I also am planning 5 days of giveaways for this week, so PLEASE keep checking in as I want
you readers to win some fun stuff again!

Happy Crafting &
Happy Halloween!


Day 21: A whole lot of flowers…

Wednesday, October 26, 2011

This is the final craft I made for the
Crafting Over Sweeting Challenge.
Twenty-one days just flew by and I just can’t believe that is over. This featured craft is the:

Floral Monogram


If you recall, I had a whole lot of flowers left over from this craft and
I had been thinking and thinking about what to do with them.
I just love their colors and I didn’t just want to throw them away… what a waste!
I decided that I really wanted to use them in a monogram and this was the result.

For this craft you will need:


Flowers… lots and lots
*choose any color and variety you would like. Make sure to cut them down as close to the flower as you can.*
1 large cardboard letter
*JoAnn’s Etc… I love that store!*

Hot glue gun
*with tons, and I’m talking TONS, of glue. I almost used up a 30 pack of glue sticks… so stock up!*

Start gluing your flowers on.
I started on the sides, but then decided to do the top of the letter first.
**This is where you’re going to want to turn a movie on…
my movie of choice was The Proposal.**


Keep gluing

and gluing.

Did I mention to keep gluing?
Good, I didn’t think that I had.

That’s it!!

So simple and it turns out oh so beautiful.
I’m excited to finally have a monogram in our home!

Happy Crafting!

Linked up to:
Southern Lovely
Home Stories A to Z
Lil’ Luna
Someday Crafts
Sew Much Ado


Jenny @ Simcoe Street
October 26, 2011 at 9:46 PM
Looks great. This is such a great idea for a wedding, too!
Jenny
www.simcoestreet.blogspot.com


Leslie
October 27, 2011 at 12:26 AM
I really LOVE this! It’s so cute and would be great in my house. I need to get my buns over to Joann’s and get me an L


Katie
October 27, 2011 at 5:51 AM
Great job on the floral monogram!


Stacy and Jason
October 29, 2011 at 12:14 PM
I love this. You are very talented Lizalou!


Ty and Whitty
November 1, 2011 at 8:13 PM
I love it. Thank you so much for sharing and for linking up to last weeks show and share. We hope to see you and your newest project on Wednesday.
A mommy’s life…with a touch of YELLOW
tyandwhitneyulrich.blogspot.com